OFFICIAL MANUAL / FIRST CONNECTION

Shadowrocket Setup Guide: From Import to Connection Check

Follow the sequence: add a server, choose a mode, connect, verify, and troubleshoot. First establish a connection you can check, then adjust advanced settings such as DNS and On Demand.

Prepare your information: Subscription users should have the complete URL ready. For manual setup, prepare the protocol, server address, port, and authentication details. Do not share subscription links, QR codes, or passwords on public pages. Hide these details before sharing screenshots for help.

The screenshots below are official App Store screenshots. Fields may vary by Type and app version. Use the English interface labels and your own server details as a guide, not the example values in the screenshots.

STEP 01 / ADD SERVER

Add an existing server or import a Subscribe profile

Choose either method. A subscription manages multiple servers; manual setup adds one specific server entry.

Subscription URL: select Subscribe and save

Open Home in Shadowrocket and find Add Server, or use the add control on the page to open the new-entry screen. Open the Type list and select Subscribe, then paste your complete existing URL into the subscription URL field. You can enter a name to identify it, then save and return to Home. If no servers appear after saving, use the update action for that subscription entry and wait for the result. Do not repeatedly add the same URL.

When copying, select the entire URL from beginning to end, paying particular attention to the parameters after the question mark. Do not include the webpage title, instructions, quotation marks, or trailing spaces. Subscription URLs often contain access credentials, so protect them like passwords. If you have an account management page rather than a subscription URL, the app cannot parse it as a server list. Confirm the URL's purpose with your service provider before importing it.

After a successful import, return to the SERVER group on Home and check for the subscription group and server entries. Seeing a name only means the information was added to the app; it does not guarantee that the remote server is reachable. Select an entry before moving on to choose a mode. If the subscription shows traffic or an expiry date, refer to the corresponding service account for details; this does not indicate the app's purchase status.

Manual entry: Type determines the fields

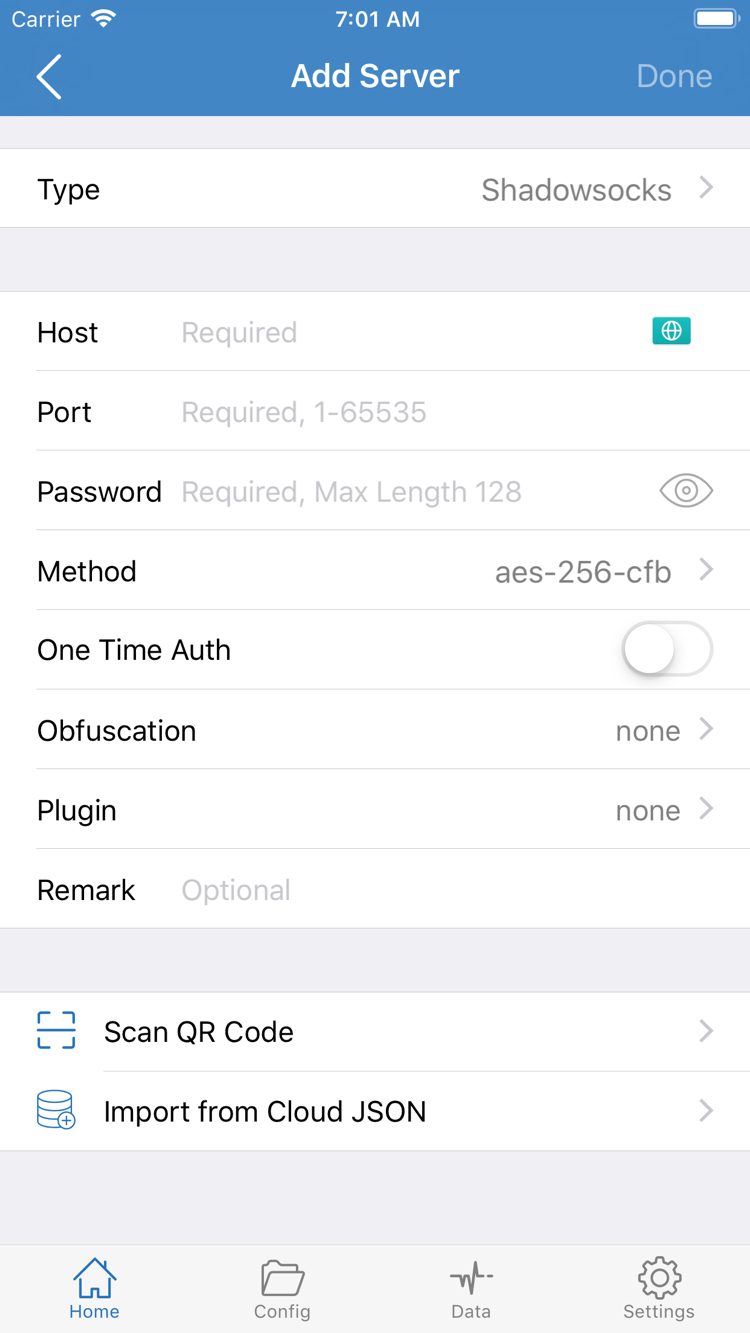
If you have details for a single server, select Type in Add Server before entering each field. In the screenshot, for example, Host is the server address, Port is the port, Password is the authentication value, and Method must match the encryption method specified by the server. Other protocols may show different authentication, transport, or TLS fields. Fill them using your existing details; do not apply one protocol's fields to another.

Host is generally a domain name or IP address; do not append a webpage path. Enter the actual port configured on the server rather than substituting a more familiar common port. Review each field before saving, especially uppercase and lowercase letters, digits, and symbols in the password. If your information does not specify whether a field is required, confirm the protocol requirements instead of enabling extra options at random. See the glossary for protocol and field details.

QR codes and JSON: check the content type first

If you have a QR code for an existing server, use Scan QR Code and allow camera access when prompted by the system. After scanning, check Type, address, and port before saving. Import from Cloud JSON is for the corresponding JSON import data; it is not a general-purpose field for any subscription URL. Whichever method you use, return to the SERVER group and check the entry so you do not mistake an open editing screen for a completed addition.

Step complete when: Home shows a selectable server entry and you know which entry is selected. Next, decide which requests should use that server.

Shadowrocket Add Server screen showing Type, Host, Port, Password, Method, Scan QR Code, and Import from Cloud JSON
Add Server: select Type first, then fill in the corresponding fields from your existing information. The fields shown do not apply to every protocol.

STEP 02 / GLOBAL ROUTING

Choose Global Routing and check the configuration

The server determines the available proxy endpoint; the mode determines how requests are handled. They are separate choices.

Return to Home, tap Global Routing, and check the current selection. First, distinguish the three modes: Config, Proxy, and Direct. Config here is a routing mode, while Config in the bottom navigation manages configuration files. They are related, but opening a file to view it does not mean it is selected as the active configuration.

Config: let rules determine request routing

If you have a configuration file from a source you trust and understand, you can select Config. Then go to the Config page and confirm which file is active. Check the policies and order in Rule. Requests are generally routed according to the matching rule's PROXY, DIRECT, or REJECT policy. Policy names referenced in the configuration must have corresponding definitions; importing a server subscription alone does not import a complete set of rules.

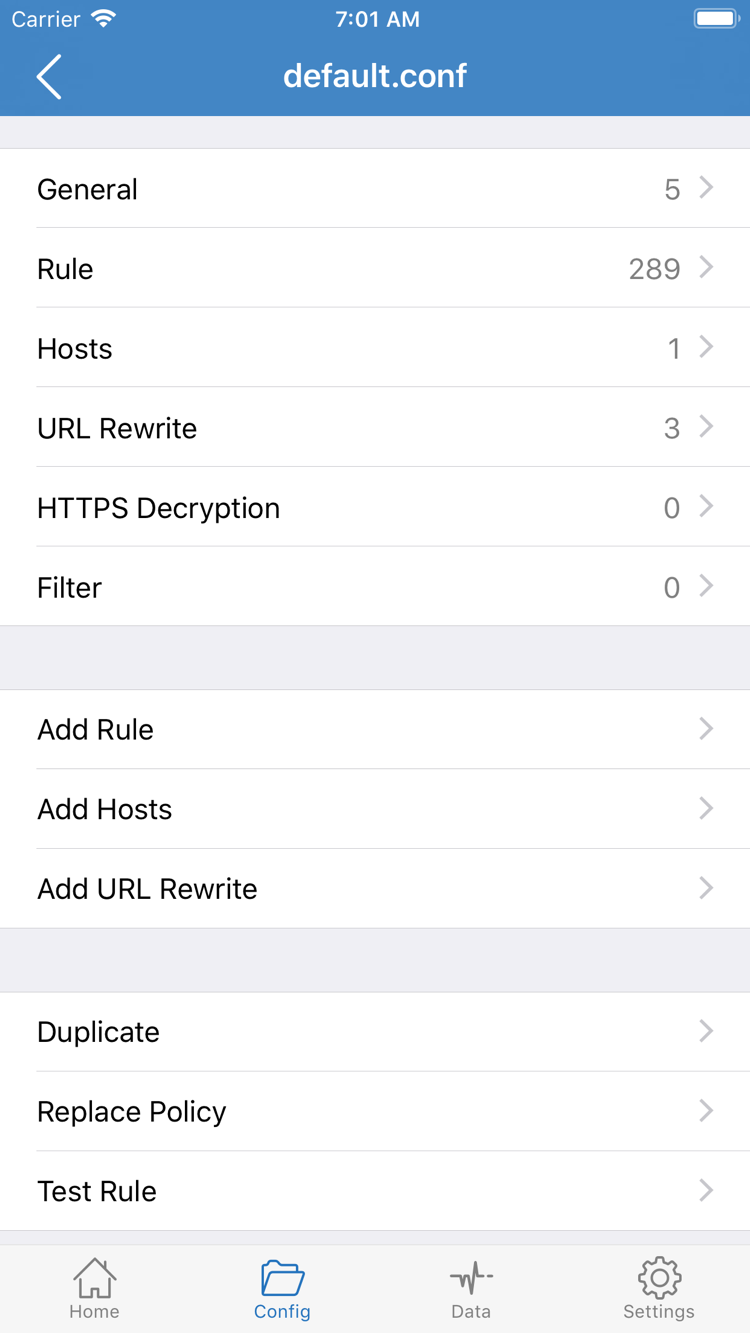
The official screenshot shows sections in the configuration editor: General, Rule, Hosts, URL Rewrite, and HTTPS Decryption. For a first connection, just check the active file and Rule. You do not need to edit every section or enable HTTPS Decryption to complete this guide. Add Rule creates a rule; avoid adding rules at random before understanding the existing order, as an early match could turn a connection problem into a rule-matching problem.

Proxy and Direct: choose a specific route

If you do not yet have a configuration you can verify, you can briefly use Proxy to check basic connectivity through the selected server. In this mode, the selected server generally handles requests that can be proxied; do not assume that all system traffic follows the same route. Direct bypasses the proxy server. Accessing a website in this mode does not prove that the server you just added is working.

If Proxy can access a destination but Config cannot access the same one, check the rules, policy references, and DNS resolution path first rather than changing the password immediately. If both modes fail, check the server and current network. After changing modes, send a new request; existing connections may keep using their original route. To understand matching for DOMAIN-SUFFIX, IP-CIDR, FINAL, and other rules, see proxy mode guidance and the Settings reference. This guide keeps changes to a minimum.

Step complete when: You can identify the current mode. If using Config, you can also confirm the active configuration file. Note this state before authorizing the connection.

Shadowrocket Config editor showing General, Rule, Hosts, URL Rewrite, HTTPS Decryption, and Add Rule
Config editor: rules are in the Rule section. This is not the Global Routing mode selector on Home.

STEP 03 / HOME

Turn on the top switch and authorize the system connection

Before connecting, check again that a server is selected and Global Routing matches what you want to test.

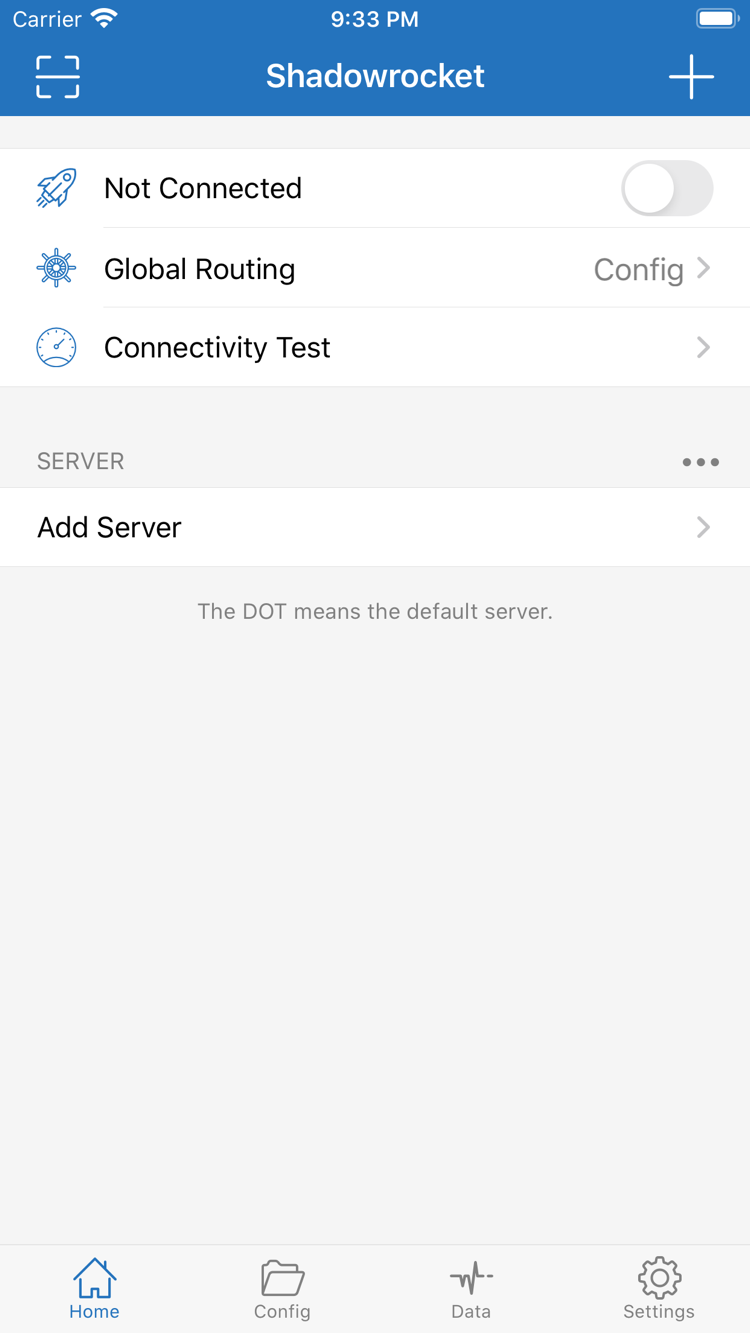
Return to Home, select the server you want to use in the SERVER group, and check the selection indicator. Then turn on the connection switch at the top. On first use, the system may ask permission for Shadowrocket to add a VPN configuration. Review the prompt, confirm that you initiated the action, and complete authorization or device authentication as required by the system. This authorization lets the app handle the relevant network requests; it does not fill in missing server parameters.

If you declined authorization, return to the app and start the connection again to see whether the system prompt reappears. If you still cannot continue, check the related status in the system's VPN configuration management. Do not install configuration profiles from unfamiliar pages to “fix” the connection. On managed devices, system policies may also restrict VPN configurations; check which actions are permitted.

After authorization, return to Home and check whether the status at the top changes from Not Connected. Wait for it to stabilize. Avoid rapidly toggling the switch: connection attempts, disconnections, and test requests can overlap, making it harder to identify the result of each action. If the switch immediately turns off again, note the error. If the connection remains in progress, keep the current configuration and continue to the troubleshooting section.

A VPN status in the system only indicates that the tunnel or network extension is in the corresponding state; it does not mean every remote request has succeeded. Server authentication, destination access, DNS resolution, and rule matching still need to be checked separately. Before testing is complete, leave On Demand disabled so automatic connections do not interfere with checks of the manual switch.

Step complete when: System authorization is complete, the connection status on Home is stable, and the selected server has not changed unintentionally. Next, check availability with an actual request.

Shadowrocket Home screen showing the Not Connected switch at the top, followed by Global Routing, Connectivity Test, the SERVER group, and Add Server
Home: the screenshot shows the disconnected state. The connection switch, Global Routing, and Connectivity Test are three separate controls.

STEP 04 / CONNECTIVITY TEST

Check whether it works and distinguish tests from actual access

Once the connection is stable, run Connectivity Test from Home and wait for the result. The result depends on the test destination, method, and current network. A response means the route for this test was reachable; it does not guarantee that every website, app, or protocol is available. Consider actual access alongside a timeout rather than concluding from one number that the server is entirely unavailable.

Next, open a destination service you already need and reload the page or send a new request. Prefer content that must be fetched from the network over a page that may be cached. If normal browsing works but an app still fails, note the specific action, time, and error message. Do not attribute an isolated failure to the entire client.

Return to Shadowrocket and review relevant traffic readings in Data, along with any available connection or log records. An increase in traffic means data was counted along the monitored path, but background requests may also generate traffic. Total traffic alone does not prove that a specific destination used PROXY. To verify routing, check the destination, matched rule, and final policy together. If the available records are insufficient, enable appropriate diagnostics and send the request again.

Record your findings in this order: “connection stable → test returned a result → actual destination accessible → policy behaved as expected.” If you have only completed the first two checks, describe the result as basic connectivity rather than saying that all rules are correct. If you temporarily changed to Proxy for testing, switch back to your intended mode afterward and check the same destination again to confirm that your normal setup works as expected.

STEP 05 / SETTINGS & DIAGNOSTICS

Troubleshoot by failure stage and keep the original configuration

Find the step where the process stopped before changing related settings. Reinstalling the app is not the first step.

Subscription not imported, or no servers after an update

Start with the specific error reported by the subscription update. A retrieval failure is different from a content parsing failure. For a retrieval failure, check the device's basic network connection, the complete URL, and subscription access permissions. For a parsing failure, confirm that the returned content is server information the app can recognize, not a login page, expiry notice, or ordinary webpage. If the update succeeds but there are no usable entries, check for filters and whether the subscription contains active servers.

Do not paste a complete subscription URL containing credentials into a public testing service. To check subscription status, use the account page for your service or describe the error to the original service provider. Keep existing entries and check or update them first rather than deleting everything and adding it again.

Server added, but the connection fails or disconnects immediately

Reopen the server editor and check Type, Host, Port, and authentication details. If using TLS or a specific transport, also check related fields such as the server name and path. Use your existing information rather than guessing. Confirm that the device time is correct, then check whether the current network allows access to the address and port. Correct parameters do not guarantee that the server is online; contact the original service provider if needed.

If system authorization is incomplete, resolve that first instead of changing the server password. If another automatic connection behavior changes the connection as soon as it starts, check On Demand in Settings and consider the status of other VPN configurations on the system. Complete a manual connection check first, then configure on-demand connection conditions.

Connectivity Test fails, but some destinations work

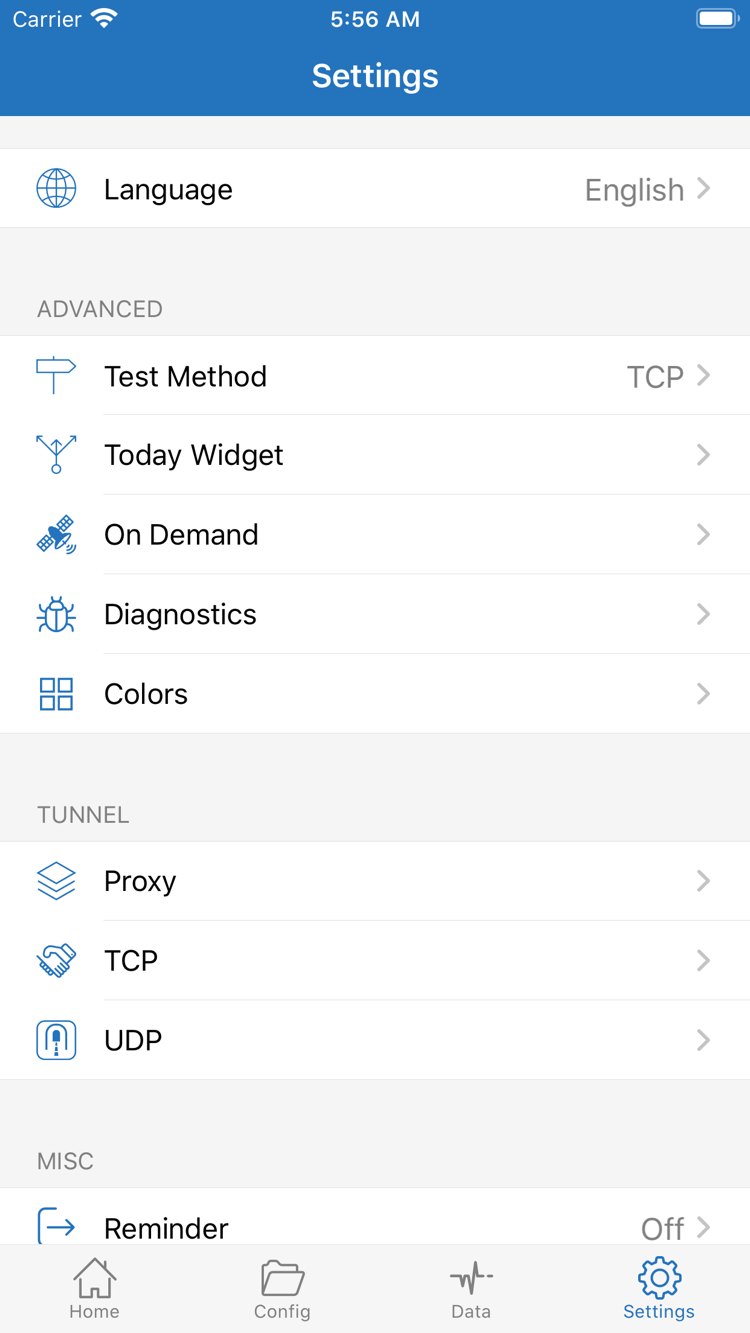
Open Test Method in Settings and confirm that the selected method is appropriate for what you want to check. A test that gets no response does not necessarily mean webpage requests will fail; likewise, a successful test does not prove that authentication, DNS, and the destination service are all working. Keep the server and mode unchanged, cross-check with another destination you actually need, and then decide whether to adjust the test settings.

Connected, but a destination will not open or routing is unexpected

First distinguish DNS resolution failures, connection timeouts, authentication errors, and errors returned by the destination service. If you suspect DNS, note the current values, then use the Settings reference to check how system DNS, custom DNS, and rules work together. Do not add multiple DNS addresses from unknown sources at once. If Proxy works but Config does not, check whether Rule matches REJECT too early, routes to DIRECT unexpectedly, or references a missing policy.

Keep a copy of the original configuration before changing rules. After editing, establish the relevant request again and check what matched. DOMAIN-SUFFIX and DOMAIN-KEYWORD have different matching scopes, while IP-CIDR matches addresses; do not infer their behavior from rule names alone. To review the basics, see the rule keyword glossary before editing the configuration.

Prepare diagnostic information that can be checked

Diagnostics in Settings can be used as a starting point; available options depend on the current interface. Record the mode, server protocol, network in use, failed step, and exact error message. Before sharing logs, check for addresses, authentication details, and subscription parameters, and remove sensitive information. “A domain times out in Config but works in Proxy” is more useful for troubleshooting than simply saying “it does not work.”

Step complete when: You can identify whether the issue is with importing, authorization, the server, DNS, or rules, and have recorded the relevant observations. If the connection is restored, return to your usual settings one at a time rather than treating a temporary troubleshooting mode as the final configuration.
Shadowrocket Settings screen showing Language, Test Method, Today Widget, On Demand, Diagnostics, Proxy, TCP, and UDP
Settings: this guide covers troubleshooting options such as Test Method, On Demand, and Diagnostics. Configure other items as needed.

CONTINUE / PLATFORM & REFERENCE

Get Shadowrocket for other devices and find further setup references

Expand settings after the connection is stable

This page covers the first import and connection check. Adjust DNS, On Demand, Log, Proxy ports, synchronization, and other settings individually for your needs, and keep a configuration you can restore.

  • Settings reference: review what settings mean and how to choose values.
  • Proxy modes: understand how modes, rules, and policies relate.
  • Glossary: check protocols, subscriptions, and rule keywords.

This guide explains how to use information you already have; it does not provide server resources. Subscription access and service status depend on the account information for your existing service.